
RabbitMQ는 AMQP(Advanced Message Queuing Protocol)을 구현되었습니다. (https://www.amqp.org/)
AMQP는 queue, exchange, binding 이라는 세 개의 개념으로 구성됩니다.
- queue는 메시지를 보관하고 소비자가 메시지를 선택하기를 기다립니다.
- exchange는 게시자가 새 메시지를 추가하기 위한 진입점
- binding은 메시지가 exchange로 queue로 라우팅되는 방법을 정의합니다.
RabbitMQ 실행
docker를 이용해서 Rabbitmq를 실행해보자(rabbitmq 3.8)
|
1
|
docker run -it --rm --name rabbitmq -p 5672:5672 -p 15672:15672 rabbitmq:3.8-management
|
cs |
다음과 같이 실행되며 5672, 15672 포트를 사용한다.
(listeners.tcp.default = 5672, management.tcp.port = 15672)

그리고 새로운 터미널을 열어 해당 컨테이너의 bash를 실행시킨다.
|
1
|
docker exec -it rabbitmq bash
|
cs |
해당 터미널에서 rabbitmqadmin 커맨드라인 도구를 사용한다. rabbitadmin 커맨드라인 도구는 RabbitMQ 설치 시 함께 설치된다.
토픽 큐를 만들기 위해 exchange를 하나 만든다. 그래서 RabbitMQ가 새로운 메시지를 받고 워커가 queue에서 메시지를 가져갈 수 있게 한다. 또한 토픽에 따라 각각의 queue로 메시지가 라우팅되도록 binding을 사용한다.
|
1
2
|
$ rabbitmqadmin declare exchange name=incoming type=topic
exchange declared
|
cs |
그리고 큐를 두 가지 만드는데 첫 번째 큐의 이름은 hello, 두 번째 큐의 이름은 world 이다.
|
1
2
3
4
|
$ rabbitmqadmin declare queue name=hello
queue declared
$ rabbitmqadmin declare queue name=world
queue declared
|
cs |
그리고 토픽이 hello. 접두사로 시작하면 hello 큐에 들어가고, world. 접두사로 시작하면 world 큐에 들어가도록 설정한다.
|
1
2
3
4
|
$ rabbitmqadmin declare binding source="incoming" destination_type="queue" destination="hello" routing_key="hello.*"
binding declared
$ rabbitmqadmin declare binding source="incoming" destination_type="queue" destination="world" routing_key="world.*"
binding declared
|
cs |
Pika를 이용한 RabbitMQ
위와 같이 설정한 후 RabbitMQ를 연동하기 위해 파이썬 RPC 클라이언트인 Pika를 사용합니다. Pika는 Pythond에서 AMQP 0-9-1 프로토콜을 사용하게 해주는 라이브러리 입니다.
|
1
|
$ pip install pika
|
cs |
https://pika.readthedocs.io/en/stable/
Introduction to Pika — pika 1.2.0 documentation
© Copyright 2009-2017, Tony Garnock-Jones, Gavin M. Roy, Pivotal Software, Inc and contributors. Revision 0537c8f3.
pika.readthedocs.io
Pika에서 할 수 있는 모든 것은 rabbitmqadmin에서 할 수 있습니다. 시스템 상태 확인이나 메시지를 보내고 받을 수 있으며, 큐에 들어있는 메시지도 확인할 수 있습니다.
다음은 태스크를 실행하는 Consumer로 hello 큐에서 메시지를 가져와 출력하는 코드입니다.
|
1
2
3
4
5
6
7
8
9
10
11
12
13
14
15
16
17
18
19
20
21
22
23
24
|
# rabbitmp_consumer.py
from pika import BlockingConnection, BasicProperties
def on_message(channel, method_frame, header_frame, body):
label = method_frame.routing_key
print('-- 새 메시지 --')
print('label : ', label)
print('body : ', body)
channel.basic_ack(delivery_tag=method_frame.delivery_tag)
connection = BlockingConnection()
channel = connection.channel()
channel.basic_consume(queue='hello', on_message_callback=on_message)
print("메시지 수신 대기 중")
try:
channel.start_consuming()
except KeyboardInterrupt:
channel.stop_consuming()
connection.close()
|
cs |
우선 터미널을 열어 consumer를 실행합니다.
|
1
|
$ python3 rabbitmq_consumer.py
|
cs |

다음은 메시지를 생성하는 Publisher 코드로 rabbitmqadmin으로 만든 'incoming' exchange에 메시지를 두 개 개시하는 코드 입니다. 사전 설정에서 hello로 시작하는 topic은 hello queue에, world로 시작하는 topic은 world queue에 삽입하도록 설정하였기 때문에 이 RPC 호출은 hello와 world 큐에 메시지를 하나씩 추가합니다.
|
1
2
3
4
5
6
7
8
9
10
11
12
13
14
15
16
|
# rabbitmq_publisher.py
from pika import BlockingConnection, BasicProperties
def message(topic, message):
connection = BlockingConnection()
try:
channel = connection.channel()
props = BasicProperties(content_type='text/plain', delivery_mode=1)
channel.basic_publish('incoming', topic, message, props) # incoming exchange로 publish
finally:
connection.close()
message('hello.1', 'hello task1')
message('world.2', 'world task2')
|
cs |
다른 터미널을 생성하여 위의 파이썬 파일을 실행합니다.
|
1
|
$ python3 rabbitmq_publisher.py
|
cs |
publisher에서 메시지를 추가하면 consumer에서 메시지를 하나 가져와서 출력하는 것을 확인할 수 있습니다. 접두사가 'hello'인 메시지만 가져오도록 되어있기 때문에 hello task만 출력되는 것을 확인할 수 있습니다.

RabbitMQ Management Plugin에서 확인
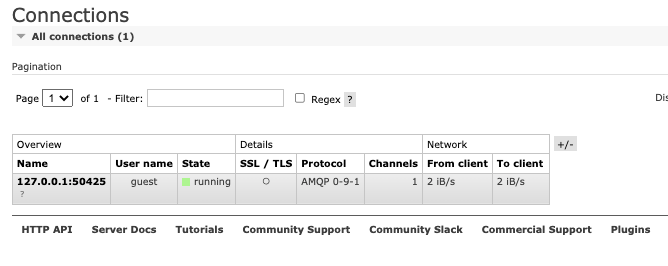
위의 내용을 웹브라우저에서 localhost:15672로 Rabbit Management Plugin에 접속하여 확인해보면 다음과 같습니다.
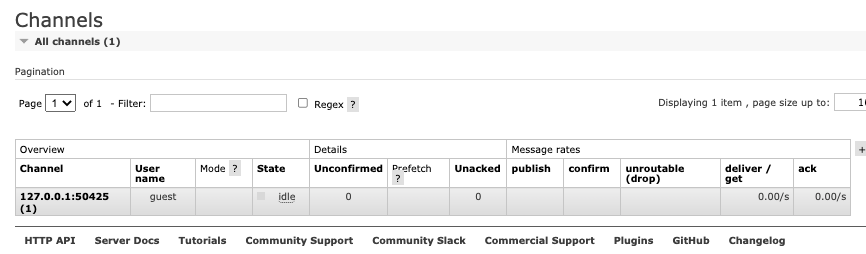
Consumer가 Channel을 만들고 메시지 수신을 대기하고 있기 때문에 Connections와 Channels에 하나의 연결이 나타납니다.
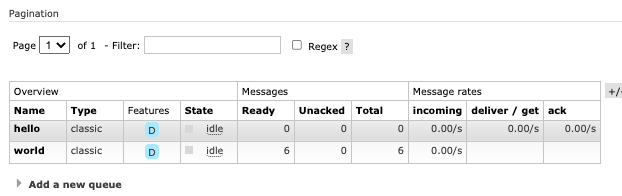
그리고 Queues는 hello와 world 총 두 개의 queue가 존재합니다. hello queue의 작업은 consumer가 수행하였기 때문에 0개 이지만, world 작업은 Consumer가 없어 남아있는걸 확인할 수 있습니다.(이는 RabbitMQ의 메시지 영속성에 해당됩니다.)
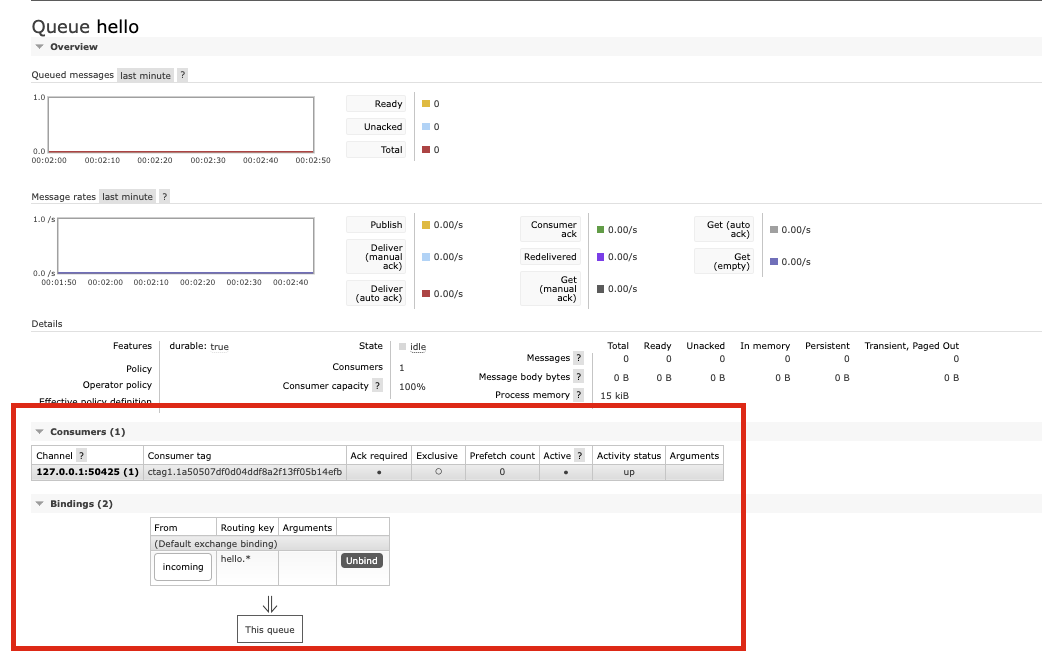
또한 hello queue를 클릭하여 자세한 내용을 보면 Consumer가 하나 등록 되어있고, Binding에서 incoming으로 hello.* 의 key를 가진 메시지가 생성되면 This Queue로 push한다는 내용도 적용이 되어 있습니다.
Python에서 pika를 이용하여 RabbitMQ를 사용해보았습니다.
'About > Flask' 카테고리의 다른 글
| [Backend] 백엔드 API 패턴 - 레이어드 아키텍처 패턴(layered architecture) (2) | 2022.02.04 |
|---|---|
| [Flask] JWT access token 인증(로그인 토큰 인증) (0) | 2022.01.19 |
| [Flask] 비동기 호출(태스크 큐, 토픽 큐, RabbitMQ) (0) | 2022.01.04 |
| [Flask] Session 객체를 이용한 동기식 호출 (0) | 2021.12.31 |
| [Flask] Flask-SQLAlchemy 사용해보기 (1) | 2021.12.30 |


